1.7 Required practical: using a light microscope
How to prepare a slide of onion cells, focus a light microscope safely, make a good labelled biological drawing, and work out the magnification of your drawing.
The practical
Key terms
- Specimen: the sample that is being looked at under the microscope.
- Cover slip: a very thin square of glass or plastic placed over the specimen.
- Stain: a coloured chemical that makes parts of a cell easier to see.
- Scale bar: a line on a drawing that shows a known real length.
- Field of view: the circle of the specimen that you can see through the microscope.
Aim: to use a light microscope to observe, draw and label plant and animal cells, and to include a magnification scale.
Preparing a slide of onion cells
You need an onion, forceps, a sharp knife or scalpel and a white tile, microscope slides, cover slips, a dropper, water, iodine solution, a mounted needle, paper towel and a light microscope.
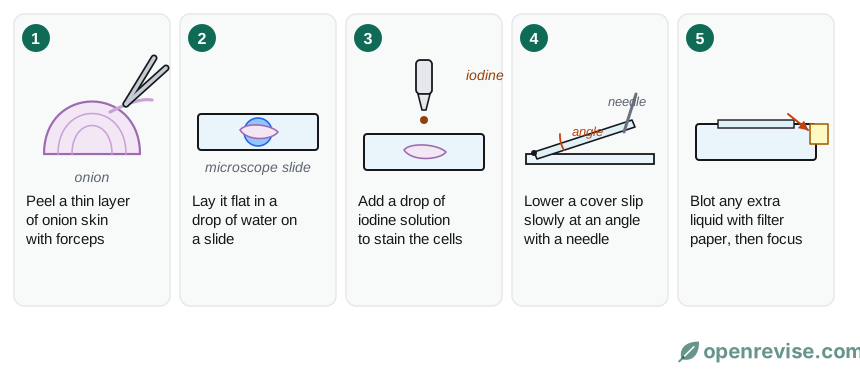
- Put a drop of water on a clean slide.
- Cut a small square of onion. Use forceps to peel off a thin layer of the inner skin (the epidermis): you want a layer that is one cell thick.
- Lay the skin flat in the drop of water, so that it does not fold over.
- Add a drop of iodine solution to stain the cells.
- Hold a cover slip at an angle next to the drop. Lower it slowly, using a mounted needle, so that air bubbles are not trapped.
- Blot away any extra liquid from the edge of the cover slip with paper towel.
You can also look at cheek cells. Wipe the inside of your cheek with a clean cotton bud, smear the cells onto a drop of water or methylene blue on a slide, and add a cover slip. Use each cotton bud only once and put used cotton buds and slides into disinfectant.
Safety: iodine stains skin and clothes, so wear eye protection. Cut away from your fingers on a tile. Glass slides and cover slips break easily. Wash your hands at the end.
Using the microscope
- Clip the slide onto the stage, with the specimen over the hole.
- Turn the nosepiece to the lowest-power objective lens (usually ×4).
- Look at the microscope from the side and use the coarse focus knob to raise the stage until the lens is close to the slide. Never look down the eyepiece while you do this.
- Look through the eyepiece and turn the coarse focus knob to lower the stage slowly until the cells come into view.
- Turn the fine focus knob until the image is sharp.
- To see more detail, switch to a higher-power objective lens and refocus with the fine focus knob only.
You start with the lowest power because it gives the widest field of view, which makes the specimen easier to find, and it keeps the lens furthest from the slide, so you are less likely to crush it.
Drawing what you see
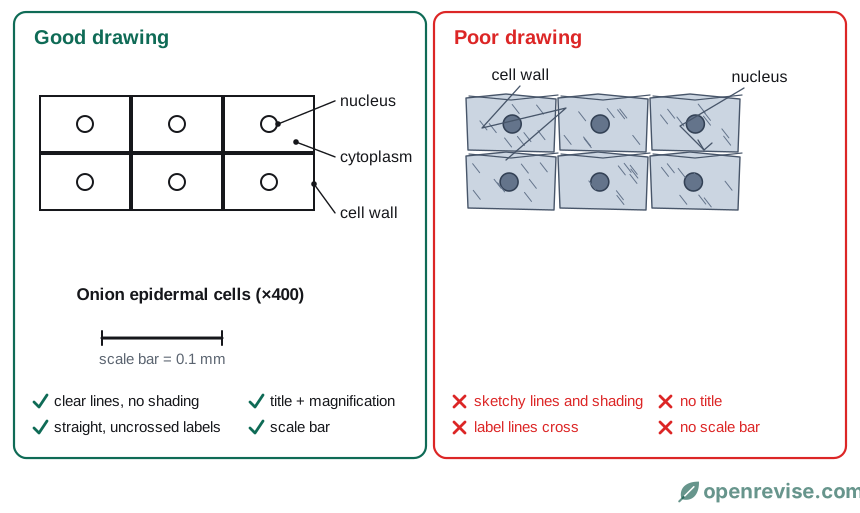
A good biological drawing:
- is done in sharp pencil, with clear, single lines and no shading or colouring in;
- is large, filling at least half the space, and shows a few cells that you can really see, not the whole field of view;
- has label lines drawn with a ruler, which touch the structure, do not cross, and have the labels written outside the drawing;
- has a title that says what it shows, and the magnification;
- has a scale bar.
Working out the magnification of a drawing
Measure the length of a cell in your drawing with a ruler, in mm. Use the magnification equation, with the same units for both:
Example. A cell in a drawing is 48 mm long. Its real length is 0.12 mm.
magnification = 48 ÷ 0.12 = ×400
To draw a scale bar, multiply the real length you want to show by the magnification. A bar for a real length of 0.1 mm at ×400 is 0.1 × 400 = 40 mm long.
What you should see
- Onion cells are rectangular, in a regular pattern. You can see the cell wall and the nucleus. There are no chloroplasts, because the inner skin of an onion is underground.
- Cheek cells are irregular and rounded. You can see the cell membrane and the nucleus, but there is no cell wall.
Test yourself on this lesson
7 exam questions · 17 marks · with mark schemes and model answers
Found a mistake?